Tag: Tips & Tricks

  • How to stop zoom in on input focus on mobile devices

    How to stop zoom in on input focus on mobile devices

    It has been almost a year since Safari (starting from iOS 10) disabled web developers ability to prevent user zoom.

    We normally the viewport meta for granted.

    <meta name="viewport" content="width=device-width, initial-scale=1.0, maximum-scale=1.0">
    

    This was a bulletproof solution to make our mobile responsive pages looks the same in all mobile browsers while we ignored that many users struggled to read our hand-picked crafted fonts and our 4K display supported font size.

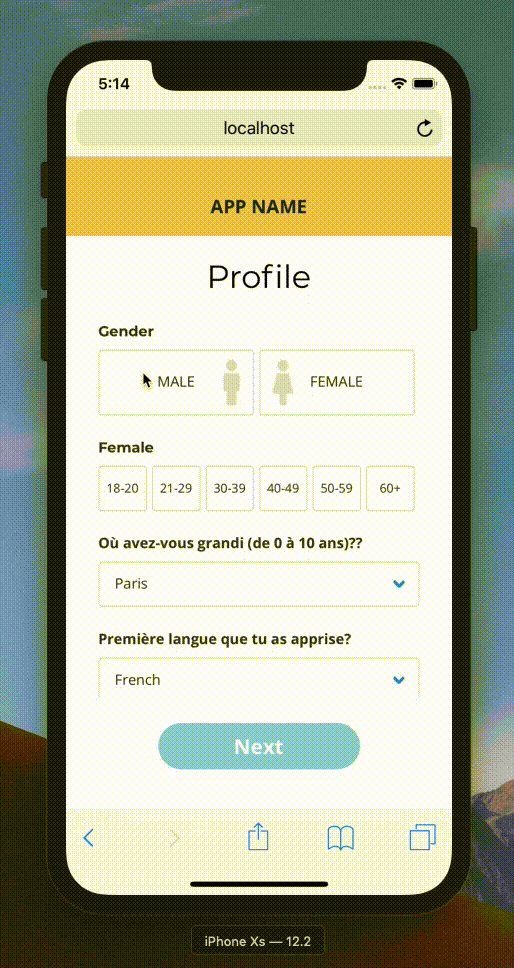
    We had one more problem. When users tap in any form fields – the webpage zoom in automatically.

    Problem

    Now I know for the fact that – allowing this feature stay unchanged is recommended – sometimes we do need to honour the client request and sometimes this zoom creates unwanted bugs in the UI.

    For example – a date picker input – if zoomed in mobile – would most likely break the UI.

    Continue reading below for the fix.

    You might be interested in:

    https://www.expiredqueues.com/youtube/why-i-never-make-a-youtube-video/
    I walk you through my procastination of how I never end up getting to the point.

    How To Fix

    By default, all mobile browsers force the form element to work as it is. But when a developer sets the font size less than 16 pixels on any form element – mobile browsers intervene and forces the UI or Page to zoom so that the texts are readable enough.

    You guessed it, the solution.

    Apply below

    @media screen and (max-width: 767px) {
      input, select, textarea {
        font-size: 16px;
      }
    }
    

    Please note, you can set any value for the max-width property as per your style guide or UI design.

    Same, the font-size: 16px might be overridden by other higher specificity rules, like other classes, selectors etc.

    It’s a good idea to use !important just in this case. You are restraining the selector only for mobile that means it won’t break your other UIs

  • Git commands I wish I knew early

    Git commands I wish I knew early

    It has been a little more than a decade since I started coding.

    Started career in this industry as a web designer, then moved on to become front-end developer with savvy HTML and CSS tricks. Later around 2012 started renaming all resume and online profiles to claim to be JavaScript developer – with Vanilla JS, AngularJS blah.. blah.. blah… and then now a full-stack developer. Heck!!!

    One simple thing has remained consistent even though I have moved on from position to position, shifting focus from design to programming, changing primary language from Photoshop to PHP to JavaScript – is the tools I use to work.

    Git and Github, in particular, has played a major role in the career. Along with its useful features – it brought many nightmares as well.

    Committing passwords, secret keys, unwanted changes etc. – I have had my fair share of embarrassments! I wish I knew more than `git push` and `git pull`.

    Git commands I wish I knew early

    1. Ignore changes from tracked files, temporarily
    2. Undo local changes
    3. Remove file from remote Git repository but keep locally
    4. Remove git tracking entirely from a project

    1. Temporarily ignore changes from tracked files

    Tell Git to stop tracking changes

    git update-index --assume-unchanged filename.ext 

    and to start tracking again –

    git update-index --no-assume-unchanged filename.ext 

    2. Undo All Local Changes

    Please note the dot, meaning reset everything to last pull state in the current directory.

     git checkout . 

    If you just wish to reset one file, replace the dot with filename.ext

    3. Remove file from remote Git repository but keep locally

    You join the project in the sometimes in the middle of dev activities. The File is already on the remote repository – let us say ‘.env’ or my ‘secret.keys’.

    Following command to rescue:

    git rm --cached filename.ext 

    Or if you have to remove an entire directory, .e.g. `fakedata/` then:

    git rm --cached -r directoryName 

    Above, “-r” means, recursively. 

    4. Remove git tracking entirely from a project

    Let’s say you cloned a git repo, some boilerplate or starter template but it has all the tracking pointed towards its author git repository.

    When you need to start fresh and remove the old git tracking and initialize new git repo, do following:

    rm -rf .git

    Example above, “-rf” means recursively force the command. Git stores all tracking data inside hidden “.git” directory. All we did here is deleted that directory.

    Now if you wish to start fresh git repo on this same directory – “git init” should do.

    Tips

    Take a look on StackOverflow for top voted questions.

    https://stackoverflow.com/questions/tagged/git?sort=votes&pageSize=15

  • How to set Cookies to share across all subdomains using JavaScript

    Browser Cookies, is a very handy feature that enables us as a web developer to do so many interactive programming. Recently since HTML5 raised up, its Web Storage is replacing this feature. But there is one area where Web Storage fails to achieve the result – subdomain access. There we have to again jump back for old school document.cookie method.

    In this very quick tutorial, lets discuss how we can setup browser cookies that can be accessed from all subdomains and root domain. But proceeding further requires basic knowledge of cookies, and if you need to learn, Tutorial Point has good article on JavaScript Cookies.

    Steps:

    1. Prepare the cookie name/value
    2. Get the top level domain and assign as .domain.com
    3. Set the path to root path=/
    4. Set Expires (optional)

    Lets set up a example cookie. Example take as ‘Last time report generated’ to showup across subdomains.

    
    //variables
    var LastReportGenerated="Jul 11 2013",
    baseDomain = '.expiredqueues.com',
    expireAfter = new Date();
    
    //setting up  cookie expire date after a week
    expireAfter.setDate(expireAfter.getDate() + 7);
    
    //now setup cookie
    document.cookie="Report={'ReportName':'MainReport', 'lastGenerated':" + LastReportGenerated + "}; domain=" + baseDomain + "; expires=" + expireAfter + "; path=/";


    Major thing to take care here is:

    Your domain must be in format of “.domain.com” – dot and root domain and your path=/ always. If you don’t setup your path=/, auto path will be saved as from where the cookies is being saved hence it wont be accessible across any subdomain.

    You can try copy paste code above in the Console, and see the result in Resource Panel. If you happen to successfully run the script above, you will get a preview:

    JavaScript Cookie

    Now that ‘Report’ cookie should be available across all subdomains like = main.cssjunction.com, tuts.cssjunction.com etc.

    You might be interested in:

  • Detect Landscape/Portrait Mode using JavaScript

    Detecting device mode (landscape or portrait) using CSS3 is now very much easy and it is state of art. But it wont work on certain situations like I had. I failed to make @media queries detect device orientation on iPhone. So I came to write a JavaScript fix to get work done.

    Check my orientation test using CSS3 @media queries here. The demo page should show text ‘Portrait’ on portrait mode and ‘Landscape’ on respective mode. But it does not. You might want to try with you own device. Some of my friends said it is working.

    I Googled for the solutions, but I must say I couldn’t find any reliable one :(. If you prefer to use CSS3 media queries, check out the post on Stuff & Nonsense. And here it goes my JavaScript function that will detect the landscape/portrait mode.

    First, let us create a function called ‘checkOrientation‘ so that we can evoke it by just a name instead of repeating whole lines.

    Inside this function we will check the device orientation degree which we are going to take from window.oriantation method. If we get the degree 0 – its the mode portrait else its landscape.  Since we will be using window. orientation method, this function will only work in handheld devices. So here it goes our function:

    function checkOrientation(){
          var currMode = "";
    
          switch(window.orientation){
    
               case 0:
               currMode = "portrait";
               break;
    
               case -90:
               currMode = "landscape";
               break;
    
               case 90:
               currMode = "landscape";
               break;
    
               case 180:
               currMode = "landscape";
               break;
         }
         document.getElementsByTagName("body")[0].setAttribute("class", currMode);
    }
    

    I have used switch statement to set the currMode variable, which we are going to use as class on required html elements. I set that class on body.

    Now its time to call the function, you can call it directly or on window.load method. I think window.load method is better and safe. So lets call it:

    window.load = function() {
         checkOrientation();
    }
    

    When our page is ready, check the class of body element. We are done. But wait what if we change the orientation now? Yes, we need to update the class on orientation change.

    For this, we have window.onorientationchange method, which is also available on devices only. We will recall our function inside this method:

    window.onorientationchange = function(){
          checkOrientation();
    }
    

    Thats it. Now we are completely done. Check-out the Landscape/Portrait Mode detection demo.

  • 7 Ways to Code Faster HTML CSS

    7 Ways to Code Faster HTML CSS

    7 Ways to Code Faster HTML and CSS

    Are you a fast coder? Yes? If then how fast you can code? Being a fast typist isn’t about coding faster. Faster coding is about getting more things done with less effort. Here comes the role of productivity tools.

    Listed below are some very useful productivity tools – for Frong End Developers. The tools below will help you code must faster and saves a lot of time. After all we are not a typist :), so why don’t we use these tools:

    HTML

    1.) ZEN CODING

    Zen Coding is an editor plugin for high-speed HTML, XML, XSL (or any other structured code format) coding and editing. The core of this plugin is a powerful abbreviation engine which allows you to expand expressions—similar to CSS selectors—into HTML code.

    Best learn resource: http://coding.smashingmagazine.com/2009/11/21/zen-coding-a-new-way-to-write-html-code/

    2.) Halm

    Haml is a markup language that’s used to cleanly and simply describe the HTML of any web document without the use of inline code. Haml functions as a replacement for inline page templating systems such as PHP, ASP, and ERB, the templating language used in most Ruby on Rails applications.

    Best learn resource: http://haml-lang.com/tutorial.html

    3.) Sparkup

    You can write HTML in a CSS-like syntax, and have Sparkup handle the expansion to full HTML code. It is meant to help you write long HTML blocks in your text editor by letting you type less characters than needed.

    Best learn resource: https://github.com/rstacruz/sparkup

    CSS

    4.) LESS

    The dynamic stylesheet language. LESS extends CSS with dynamic behavior such as variables, mixins, operations and functions.

    Best learn resource: http://webdesign.tutsplus.com/tutorials/htmlcss-tutorials/get-into-less-the-programmable-stylesheet-language/

    5.) SASS

    Sass is a meta-language on top of CSS that’s used to describe the style of a document cleanly and structurally, with more power than flat CSS allows.

    Best learn resource: http://net.tutsplus.com/tutorials/other/mastering-sass-lesson-1/

    6.) Prefixr

    CSS Prefixr is a CSS pre-processor tool, that generates the cross browser css from given codes. Forget about writing multiple browser prefixes and start using Prefixr.

    7.) SpriteCow

    Sprite Cow helps you get the background-position, width and height of sprites within a spritesheet as a nice bit of copyable css.

    All of the above tools are my daily usage tools. Once you get the rid of using these tools – you will thank me for listing.

  • How to remove black border around input buttons in IE 7?

    Here I am sharing a bullet proof working solution to remove ugly black border around IE 7 input buttons.

    Problem

    The problem is there when a submit button is inside the form element. Click outside the form, form focus is gone,thus black border is gone. But form is focused when page loads so the problem exists there.

    IE7 Black border around input buttons

    Not working solution

    Every one suggest to add outline:none to fix this problem, since outline property is not supported by IE7, I say that this is a not working solution.

    Bullet proof Solution

    Just one property is required to get rid of this black border. Open you reset css file and add the these lines:

    input[type=submit],
    input[type=reset],
    input[type=button]
    {
           filter:chroma(color=#000000);
    }
    

    Why in reset css file?

    Because the problem is for all buttons in IE 7, since adding this fix in reset.css will fix our problem in entire site.

    That’s it. All black border is gone now. The fix is tried/tested against IE 7.

    Result

    Fixed IE7 Black border around input buttons

    Better if you put this fix in IE7-CSS file.

    Similar IE 7 Quick Trick

    How that sound to you? Isn’t it helpful :).
  • Resources to write better resume and cover letter

    Resources to write better resume and cover letter

    First a good Cover letter, and second a better resume – the main weapons for all candidates who are seeking for a good job. This is where you’ve got a chance to prove yourself that you’re the best fit for required position among others. It makes sense, having a good resume, but having better resumes makes more sense and helps you better stand out from the crowd.

    Update: March 2019,  this post is revisited with valid links and removed obsolete resources.

    How are you doing on creating an effective resume? Here I have listed some of the best & proven to work resources that is definitely going to help you get most of it. Write a better resume, you got to read these guidelines.

    Oxford Career Guide

    “A CV (curriculum vitae, or résumé in the US) is a summary of your academic, extra-curricular and work experience. It should be a brief document that illustrates your skills, achievements and interests.”


    Google Guidelines for preparing resumes

    “To make it easier for us to determine where you might best fit within our organization, you can take a few simple steps to help us understand your qualifications.”


    Target Jobs Career Advice

    “Graduate CVs and job applications: they can take as much planning and preparation as an essay or project write up. Here we cover the basics of how to tackle online applications, structure a graduate CV and put together a covering letter.”


    Harvard Business School’s Career Development

    “The resume is an opportunity to market yourself to a prospective employer. It should be succinct, target an employer’s needs, and distinguish you from your competitors.”


    Monster.com’s Career advice

    “In a competitive job market, we have to do everything we can to make our resumes more attractive to hiring managers. This can be difficult for older workers, who fear that even if there’s no bias (subconscious or conscious) against job seekers on the mature side of 40, a resume may make them look overqualified for the positions they want.”


    BusinessBalls Guidelines

    “While the basic rules of a good CV remain constant, the world of work and business changes quickly. This especially impacts on how managers and graduates can best show themselves to be outstanding candidates.”


    Smashing Magazines’s Tips

    “Ah, the dreaded cover letter. Boring to write, difficult to get right, and you’re usually preoccupied with other things (such as the portfolio and resume, which are also really important). Unfortunately, your cover letter is a company’s first exposure to you, and it determines whether your application is trashed or fast-tracked to the company’s to-hire list.”

  • How to remove links dotted border in IE7?

    How to remove links dotted border in IE7?

    Is your head spinning trying a:focus{outline:none;} to remove the dotted outlines in active links in IE7? Well mine was. After a long research and trying a lot test, I came to face a good, well worked trick to remove those ugly dotted borders.

    The myth

    Try out Googling on this topic and you ll find everyone is saying use this:

    	a:focus, *:focus {outline:none;}
    

    A never working fix for IE7.

    But hey, is that property supported in IE7? Simplest and fair answer is “No”. CSS ‘outline’ is not supported in IE7.

    Here you will find a quick trick how you can remove active links dotted outlines from IE7. (Sorry for recommending to use CSS expression, but this is the only solution for IE7.)

    The Solution

    Nothing more, just one lines in needed in your CSS, but its a CSS expression.

    a:focus, *:focus {
    	noFocusLine: expression(this.onFocus=this.blur());
    }
    

    Fix Dotted Borders in IE7


    Thats it. All those ugly dotted lines are gone. Its tested against IE7 only.

    Do you have another css trick on this? Share with me – comment it down.